Sunday, December 31, 2006

Random Filet Scarf

I recently finished my first venture into filet crochet, something that seems quite complicated and I wasn't sure I was ready for. Well, I didn't try anything delicate or complicated. There was no steel hook or thread involved. Instead I tried a rather simple filet scarf.


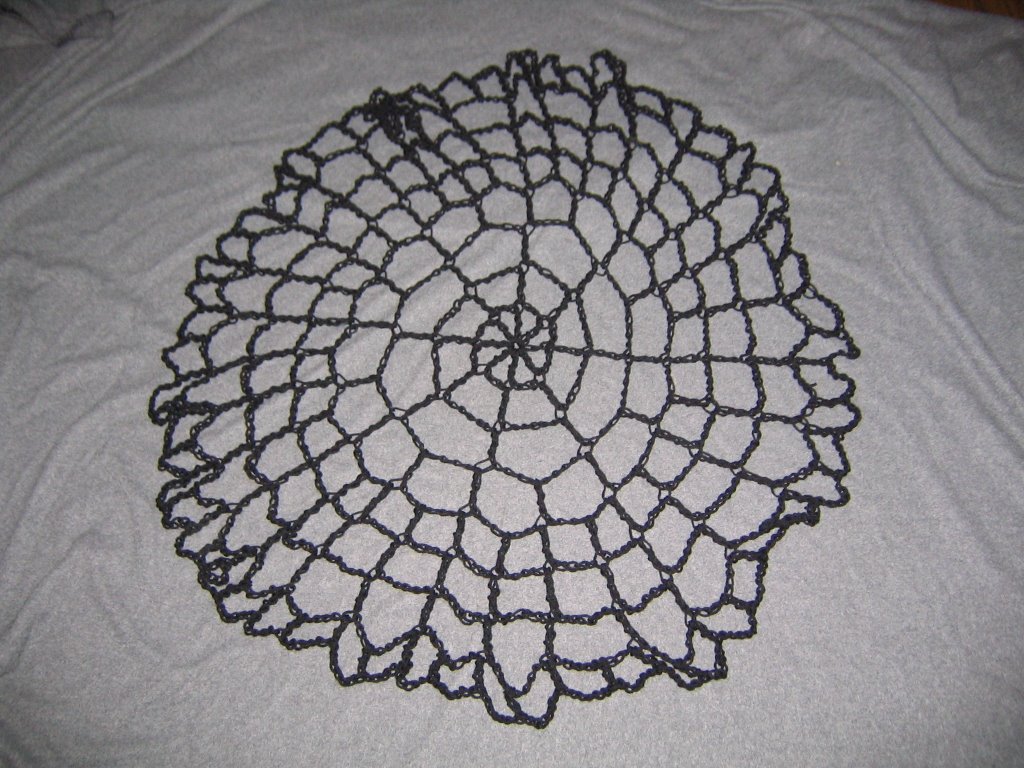
The pattern was from the Crochet Pattern-a-Day 2006 calendar. Once again, as with so many patterns from this calendar, it was loaded with mistakes. The pattern was labeled "easy" which is why I decided to try filet crochet. But the pattern instructions did not quite match the picture of the scarf. The problem is, for an introduction to filet, filet crochet is not at all described properly.

Luckily, filet is actually a simple concept of using a set number of stitches to represent blocks and the blocks are either filled in or open. It is a very logical type of pattern to follow. The key is following the grid, which is part of the pattern in a set way. The grid is like graph paper with some blocks filled in black and other left white. In this case, double crochet was used and I thought of the pattern this way: the lines of the grid were each a double crochet, a filled in block put two double crochets between each of the lines, and the open blocks were worked by making two chain stitches and skipping two stitches before working the next double crochet. This is not at all what the pattern described but is definitely what the picture showed.

Anyway, once I got the hang of it, the scarf worked through quite nicely. Initially I tried a worsted weight yarn but it was too heavy for this delicate scarf, so I switched to a lighter weight yarn. I actually used a beautiful Bernat yarn that I picked up from Value Village. The label looks rather old and I've looked on the Bernat site and it doesn't look like they make it any more. It's 76% cotton, 14% nylon, and 10% silk. The yarn is squiggly rather than straight and alternates between being really thin and thicker which leads to a great texture which is far clearer in person than in the pictures.


Hook size:
G

Materials used:
Bernat Cott'n Silk, 3 skeins of 1.75 oz.

Thursday, October 26, 2006

Pocket Mouse

Here is one of my previous crochet projects. It's a cute little mouse crocheted from a pattern I found on the internet: http://thecrochetworks.tripod.com/animals.html. It amazes me how there are so many fantastic patterns offered for free.

This little guy took only a couple of nights to do and was surprisingly easy to do. Each piece is done separately (body, nose, ears, arms, legs, and tail) and then sewn on, which if you're not fond of sewing can be a bit tedious. The sewing required for each piece is minimal but having to sewn on eight pieces is the tedious part. But it's well worth the effort for this cute little mouse. As you can see, the only real issue I seem to have had was lining up his eyes. Maybe I'll call him Drunky the Mouse.

I'm hoping to crochet his friends some day.

Hook size:
F

Materials used: Grey worsted weight yarn
Black yarn scrap, unraveled
Stuffing

Wednesday, October 11, 2006

"that's a wrap"

This is my second finished redesigned t-shirt project. The idea and instructions came from Generation T: 108 ways to transform a T-shirt by Megan Nicolay. It's project number 28 which involves transforming a t-shirt into a wrap shirt.


Now, I do love this book, it has great ideas and will help me reclaim the multitude of shapeless t-shirts that I just can't let go of but won't wear. The only issue I have is that the simplicity of the instructions means that things aren't exact which means the shirt won't always turn out exactly as it does in the picture. The other issue is that the models are skinny with less than ample bosoms. So the way the shirt looks on them is far different to the way the shirt looks on those of us who are less than skinny and actually require a bra.

The pattern calls for cutting and a bit of sewing for the belt. In reality, the large shirt that I used required more work. It was too bulky at the sides, especially after sewing the bottom of the armholes to make them smaller and fit better. When I realised the extent of this huge problem and how terrible it made the shirt look, I was disheartened. I felt better when I thought about just sewing the sides and cutting off the excess fabric to get a better fit. I was once again disheartened when I realised that t-shirts often get out of shape and no longer lay flat making them difficult to arrange to perfection. After much huffing and puffing and pouting, my trusty sewing machine did good by me and the sides to the shirt were sewn up. Much to my surprise the sewing job did the trick just as it was supposed to (note to those that would skip corners: I basted the shirt before sewing to make sure it would look right, this is not a step to be skipped as doing so could result in much yelling, crying, and throwing of things). It is not a perfect shirt. It will need to be worn with a tank underneath or with the "v" pinned to keep the "ladies" from peaking out. It would also look better if I were skinnier. But, it's wearable, though I'm not sure where I would wear it to. It does have kind of a martial arts pyjama feel to it which I think can be minimised by wearing it with a skirt rather than pants.

Materials used:
XL T-shirt
red Gutterman thread
blue thread (for basting)
needle
sewing machine
tailor's chalk
straight pins
ruler

Wednesday, September 20, 2006

Spiderweb Table Topper

It has begun. I have actually gotten my butt in gear soon enough to get going on holiday themed crafts before the holiday has come and gone. Because once the holiday is over the motivation for the themed crafts is gone and another year has to go by before I can think about doing them again.

In just over a month it will be Hallowe'en. Yay! Here is my very first Hallowe'en crochet project:

It's a spiderweb table topper. I was able to complete the project in just one evening. And I found out that not only does it look great on a table, but it's fantastic thrown over a lamp shade (please be very aware of the fire hazard putting it on a lampshade may pose). The whole thing is done with ch and tr and although it's listed as being medium difficulty, I found it very easy to do. My only advice is mark the first chain of each round to make navigating around the web a bit easier. It is possible to get a little lost if the web twists around at all.

Hook Size:
N

Materials used:
Black worsted weight yarn

Monday, September 18, 2006

Granny Square Afghan

This is one of the afghans that I've crocheted.

This was made from the Granny Square Afghan pattern in the Crochet Pattern-a-Day 2006 calendar. At first I was very frustrated with the pattern but that was mainly because I didn't really understand the concept of granny squares. As soon as I figured the basics out, it was easy sailing!

The one issue is that it's supposed to be a square afghan but if you lay this one out it's a little "off-square." Mind you that doesn't matter when you're curled up in it.

The idea with this pattern is to keep going until the afghan is as big as you want. The last couple of colour rounds on mine aren't to the width that the pattern specifies, but I'd had enough of buying yarn (or should I say getting Mel to pick up yarn) for this pattern that I just decided to end it.

Materials used:
Bernat Super Value worsted weight yarn in Sky (Thanks Mel!)
Bernat Super Value worsted weight yarn in Damson

Sunday, September 17, 2006

Net Shopping Bag

I finally finished this bag!!! After starting it a while ago, I lost the size F hook I was using. I ended up moving onto other projects that used different sized hooks. Finally I went to a nearby knitting store, Knit-O-Matic, and picked up a size F hook. I treated myself and got one made out of bamboo. It's so increadibly light.


This was made from the Net Shopping Bag pattern in the Crochet Pattern-a-Day 2006 calendar. I've found that many of the patterns in this calendar are a bit wonky and I have to make some small adjustments on them to make them work out in a way that I like. With this one, the instructions for the handles were a bit odd but I adapted and they seemed to have worked out okay. I'll know for sure once I take this bag grocery shopping, with any luck my groceries won't end up all over the ground. There was also supposed to be a bag case crocheted into the bottom of the inside of the bag. I left that out.

Materials used:
Bernat Super Value worsted weight yarn in Honey

Saturday, September 16, 2006

Crocheted Watch Cap

A year ago I had attempted to make a hat using a bulky yarn. The ribbing of the hat went well enough but when I tried to do the main part of the hat I found out the importance of using a yarn weight that actually goes with the pattern. The hat was just not working out. Well I finally looked up a pattern for a hat that uses a bulky weight yarn and luckily enough I was able to use the ribbing I had already created.

The pattern I used was the Crocheted Watch Cap from Lion Brand Yarn. You have to sign up for a free account on the Lion Brand web site in order to view their patterns. The black part of the hat was done following the larger size option in the pattern. The orange ribbing was made according to the Convertible Ear Flap Ski Hat pattern from the Crochet Pattern-a-Day 2006 calendar. The size turns out to fit a man's head.

Materials used:
1 ball Patons Bohemian in Copper Chaos
1 ball in black very similar to Patons Bohemian (I can't remember which one it was, can you Mel?)

Wednesday, September 13, 2006

Water Bottle Carrier

I like to take a water bottle with me when I go out, ya never know when you're gonna need a drink. But often the bottle doesn't fit in my bag or purse, so I figured it would be handy to have a carrier just for my water bottle.


I was thrilled when the carrier turned out to fit my Sigg water bottle perfectly! On a side note, I highly recommend visiting the Sigg web site, it's not just a water bottle, it's an experience.

The pattern came from the Pattern-a-Day Crochet calendar for 2006. If you are interested in the pattern you'll have to let me know so I can pass it along to you since there is no version on the web. I didn't follow the pattern exactly since I couldn't quite follow the instructions for the strap and ties, but they were easy enough to adapt.

Materials used:
Bernat Super Value worsted weight yarn in soft forest green
Bernat Super Value worsted weight yarn in burgundy

Sunday, September 10, 2006

Crochet Hook Case

One of the most useful items I've crocheted is a hook case. It keeps all my hooks, stitch markers, needles, scissors, ruler, pencil, and whatnot organised. I got the pattern from http://www.sarahanns.com/crochetworks/case.html.

This was a very simple project done entirely with sc except for the flower and leaves which were also surprisingly easy to do. I did make one error, the pouch in the middle was supposed to have been sewn on lower, right near the bottom. The flap at the top was actually supposed to have been attached at the sides and just meet the top of the pouch rather than overlapping it. But I'm quite happy with it the way it is. I much prefer having a flap that is easily opened rather than an upper pouch as is called for in the design. If I did it again, I think I'd make the pouch taller so that it reached the bottom of the case but leave the flap the way it is.

Materials used:
Worsted weight yarn in grey
Worsted weight yarn in green
Moda Dea "Aerie" yarn in pink (oooh, it's so soft!)
Black wooden button
Pink plastic bead
Thread (the button hole was too small to use yarn)

Hello!

My good friend, Emily RugBurn, a.k.a. "the Knotty Hooker," told me to put up pics of my crochet projects in my very own blog. So here I am, T-Ra just hooking in my hoolan (for those of you who don't know what a hoolan is, don't worry, neither do I). I'm a beginner crocheter with other crafty hobbies. I'll be sure to post pics, links, tips, and all that for my interested readers (a.k.a. Em).