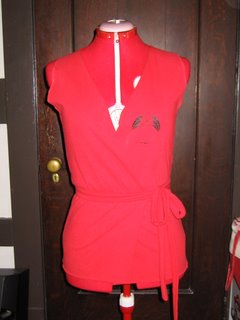
This is my second finished redesigned t-shirt project. The idea and instructions came from
Generation T: 108 ways to transform a T-shirt by Megan Nicolay. It's project number 28 which involves transforming a t-shirt into a wrap shirt.


Now, I do love this book, it has great ideas and will help me reclaim the multitude of shapeless t-shirts that I just can't let go of but won't wear. The only issue I have is that the simplicity of the instructions means that things aren't exact which means the shirt won't always turn out exactly as it does in the picture. The other issue is that the models are skinny with less than ample bosoms. So the way the shirt looks on them is far different to the way the shirt looks on those of us who are less than skinny and actually require a bra.
The pattern calls for cutting and a bit of sewing for the belt. In reality, the large shirt that I used required more work. It was too bulky at the sides, especially after sewing the bottom of the armholes to make them smaller and fit better. When I realised the extent of this huge problem and how terrible it made the shirt look, I was disheartened. I felt better when I thought about just sewing the sides and cutting off the excess fabric to get a better fit. I was once again disheartened when I realised that t-shirts often get out of shape and no longer lay flat making them difficult to arrange to perfection. After much huffing and puffing and pouting, my trusty sewing machine did good by me and the sides to the shirt were sewn up. Much to my surprise the sewing job did the trick just as it was supposed to (note to those that would skip corners: I basted the shirt before sewing to make sure it would look right, this is not a step to be skipped as doing so could result in much yelling, crying, and throwing of things). It is not a perfect shirt. It will need to be worn with a tank underneath or with the "v" pinned to keep the "ladies" from peaking out. It would also look better if I were skinnier. But, it's wearable, though I'm not sure where I would wear it to. It does have kind of a martial arts pyjama feel to it which I think can be minimised by wearing it with a skirt rather than pants.
Materials used:XL T-shirt
red Gutterman thread
blue thread (for basting)
needle
sewing machine
tailor's chalk
straight pins
ruler
 This little guy took only a couple of nights to do and was surprisingly easy to do. Each piece is done separately (body, nose, ears, arms, legs, and tail) and then sewn on, which if you're not fond of sewing can be a bit tedious. The sewing required for each piece is minimal but having to sewn on eight pieces is the tedious part. But it's well worth the effort for this cute little mouse. As you can see, the only real issue I seem to have had was lining up his eyes. Maybe I'll call him Drunky the Mouse.
