Sunday, June 03, 2007

Feather and Fan dishcloth

This is my first completed knitting project. The first project I started is a bag, but I'm still working on that. Hopefully I'll be finished and posting about it in the not too distant future.

This is from the Feather and Fan pattern from Bernat. It came on the label of the yarn. I must say that I suspect the pattern has a glaring errors. This cloth is very small and would be of little use for dishes because of it. The picture on the Bernat label shows a wider cloth with more feather and fan sections. I was not impressed with this one. But it is working out well as a TV screen duster.

Needle Size:
5 mm

Materials Used:
Bernat Crochet Cotton

Saturday, March 24, 2007

I can knit!

Thanks to the Knotty Hooker a.k.a. Emily RugBurn , I can now knit (well, this was actually a few months ago, but you get the idea). She showed me the basics and then introduced me to knittinghelp.com, which is a great how-to resource site, complete with super clear video instructions.

Being a crocheter first, I was having a hard time knitting with the yarn in my right hand. That's the way Em does it. I tried for a bit to do it this way but found it incredibly awkward and unnatural which made me the world's slowest knitter. It also made me tense up my hands so they would become sore and stiff very quickly. Luckily there's the Continental knitting method, which involves holding the yarn in your left hand. I switched to that and away I went!

Here's the first bit of knitting I did:


I followed the free Cable Scarf pattern (#60053) from Lion Brand (you need to sign up for a free account to view the patterns).


I didn't finish the scarf, since I was using a yarn that I wouldn't ordinarily use for a scarf and I didn't really want a cable scarf. This was just for practice, to get my knits and purls down!

Sunday, December 31, 2006

Random Filet Scarf

I recently finished my first venture into filet crochet, something that seems quite complicated and I wasn't sure I was ready for. Well, I didn't try anything delicate or complicated. There was no steel hook or thread involved. Instead I tried a rather simple filet scarf.


The pattern was from the Crochet Pattern-a-Day 2006 calendar. Once again, as with so many patterns from this calendar, it was loaded with mistakes. The pattern was labeled "easy" which is why I decided to try filet crochet. But the pattern instructions did not quite match the picture of the scarf. The problem is, for an introduction to filet, filet crochet is not at all described properly.

Luckily, filet is actually a simple concept of using a set number of stitches to represent blocks and the blocks are either filled in or open. It is a very logical type of pattern to follow. The key is following the grid, which is part of the pattern in a set way. The grid is like graph paper with some blocks filled in black and other left white. In this case, double crochet was used and I thought of the pattern this way: the lines of the grid were each a double crochet, a filled in block put two double crochets between each of the lines, and the open blocks were worked by making two chain stitches and skipping two stitches before working the next double crochet. This is not at all what the pattern described but is definitely what the picture showed.

Anyway, once I got the hang of it, the scarf worked through quite nicely. Initially I tried a worsted weight yarn but it was too heavy for this delicate scarf, so I switched to a lighter weight yarn. I actually used a beautiful Bernat yarn that I picked up from Value Village. The label looks rather old and I've looked on the Bernat site and it doesn't look like they make it any more. It's 76% cotton, 14% nylon, and 10% silk. The yarn is squiggly rather than straight and alternates between being really thin and thicker which leads to a great texture which is far clearer in person than in the pictures.


Hook size:
G

Materials used:
Bernat Cott'n Silk, 3 skeins of 1.75 oz.

Thursday, October 26, 2006

Pocket Mouse

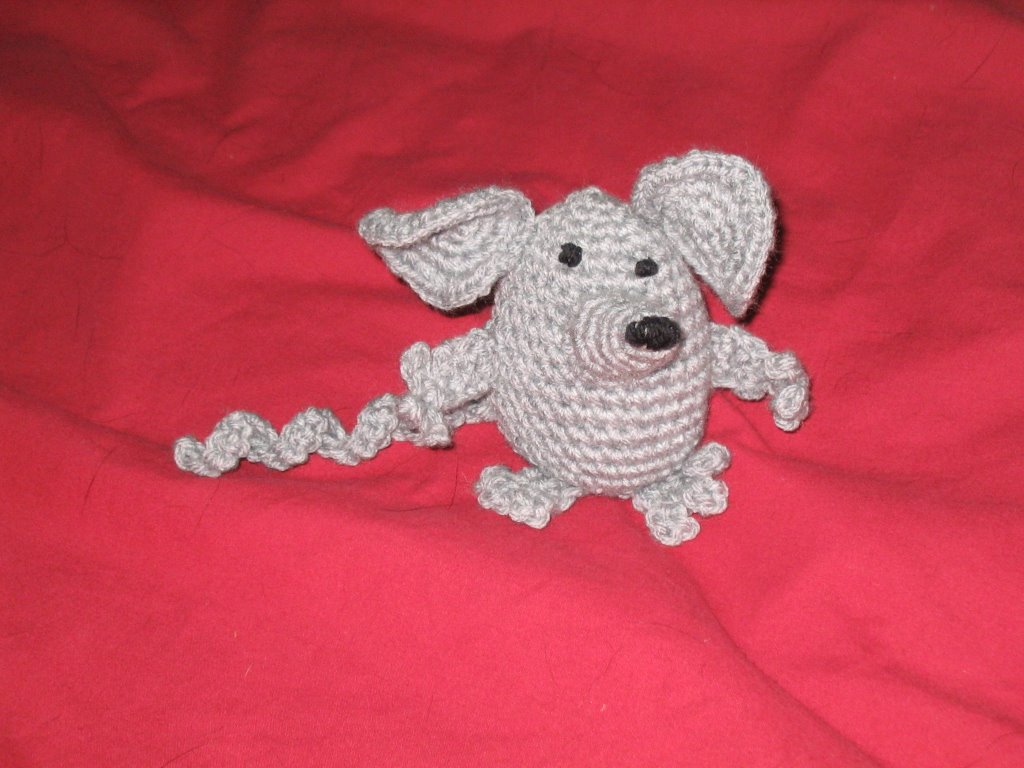
Here is one of my previous crochet projects. It's a cute little mouse crocheted from a pattern I found on the internet: http://thecrochetworks.tripod.com/animals.html. It amazes me how there are so many fantastic patterns offered for free.

This little guy took only a couple of nights to do and was surprisingly easy to do. Each piece is done separately (body, nose, ears, arms, legs, and tail) and then sewn on, which if you're not fond of sewing can be a bit tedious. The sewing required for each piece is minimal but having to sewn on eight pieces is the tedious part. But it's well worth the effort for this cute little mouse. As you can see, the only real issue I seem to have had was lining up his eyes. Maybe I'll call him Drunky the Mouse.

I'm hoping to crochet his friends some day.

Hook size:
F

Materials used: Grey worsted weight yarn
Black yarn scrap, unraveled
Stuffing

Wednesday, October 11, 2006

"that's a wrap"

This is my second finished redesigned t-shirt project. The idea and instructions came from Generation T: 108 ways to transform a T-shirt by Megan Nicolay. It's project number 28 which involves transforming a t-shirt into a wrap shirt.


Now, I do love this book, it has great ideas and will help me reclaim the multitude of shapeless t-shirts that I just can't let go of but won't wear. The only issue I have is that the simplicity of the instructions means that things aren't exact which means the shirt won't always turn out exactly as it does in the picture. The other issue is that the models are skinny with less than ample bosoms. So the way the shirt looks on them is far different to the way the shirt looks on those of us who are less than skinny and actually require a bra.

The pattern calls for cutting and a bit of sewing for the belt. In reality, the large shirt that I used required more work. It was too bulky at the sides, especially after sewing the bottom of the armholes to make them smaller and fit better. When I realised the extent of this huge problem and how terrible it made the shirt look, I was disheartened. I felt better when I thought about just sewing the sides and cutting off the excess fabric to get a better fit. I was once again disheartened when I realised that t-shirts often get out of shape and no longer lay flat making them difficult to arrange to perfection. After much huffing and puffing and pouting, my trusty sewing machine did good by me and the sides to the shirt were sewn up. Much to my surprise the sewing job did the trick just as it was supposed to (note to those that would skip corners: I basted the shirt before sewing to make sure it would look right, this is not a step to be skipped as doing so could result in much yelling, crying, and throwing of things). It is not a perfect shirt. It will need to be worn with a tank underneath or with the "v" pinned to keep the "ladies" from peaking out. It would also look better if I were skinnier. But, it's wearable, though I'm not sure where I would wear it to. It does have kind of a martial arts pyjama feel to it which I think can be minimised by wearing it with a skirt rather than pants.

Materials used:
XL T-shirt
red Gutterman thread
blue thread (for basting)
needle
sewing machine
tailor's chalk
straight pins
ruler